Airflow Basics
이번 실습은 몇 가지 기본적인 Airflow 개념에 대해 알아 보고 첫 번째 파이프라인을 작성해 보겠습니다. Airflow는 Python programming을 통해 DAG (Directed Acyclic Graph)로 작업을 정의하여 Workflow를 생성합니다. 즉, Workflow는 영원히 루프 (Loop)에 구속되지 않아야 하기 때문에 비 순환성 방향성 그래프 구조로 구성합니다.
Importing Modules
Airflow 파이프라인의 Python 스크립트는 Airflow DAG 오브젝트를 정의하기 위해 필요한 library 모듈을 Import 해야 합니다.
from datetime import timedelta

# The DAG object; we'll need this to instantiate a DAG
from airflow import DAG

# Operators; we need this to operate!
from airflow.operators.bash_operator import BashOperator
from airflow.operators.python_operator import PythonOperator
from airflow.utils.dates import days_ago
Default Arguments
DAG 오브젝트와 몇 가지 작업 (task)을 만들기 전에 각 작업을 설정하기 위해 필요한 default DAG 설정을 Python dictionary로 미리 구성하여 사용할 수 있습니다
# These args will get passed on to each operator
# You can override them on a per-task basis during operator initialization
default_args = {
    ‘owner’: ‘airflow’,
    ‘depends_on_past’: False,
    ‘email’: [‘airflow@example.com’],
    ‘email_on_failure’: False,
    ‘email_on_retry’: False,
    ‘retries’: 1,
    ‘retry_delay’: timedelta(minutes=5)
}
Instantiate a DAG
작업을 만들기 전에 DAG 오브젝트를 생성해야 합니다. DAG 오브젝트는 DAG의 고유 식별자 역할을 하는 dag_id (e.g. “Basic_DAG”)을 포함하여 몇몇 기본 설정을 정의할 수 있습니다.
dag = DAG(
    'Basic_DAG',
    default_args=default_args,
    description='A basic DAG',
    schedule_interval=timedelta(days=1),
    start_date=days_ago(2),
    tags=['example'],
)
Tasks
작업은 Airflow Operator 오브젝트를 인스턴스화하여 생성합니다. 즉, Operator에서 인스턴스화 된 오브젝트를 작업이라고 합니다. Operator의 첫번째 인수인 task_id는 작업의 고유 식별자 역할을 합니다. 다음 t1 및 t2 작업은 BashOperator를 통해 생성 된 작업이며, 각 각 Bash shell에서 bash_command에 정의 된 명령어를 실행합니다.
t1 = BashOperator(
    task_id=’print_date’,
    bash_command=’date’,
    dag=dag,
)

t2 = BashOperator(
    task_id=’sleep’,
    depends_on_past=False,
    bash_command=’sleep 5’,
    retries=3,
    dag=dag,
)
Bash Operator는 모든 Operator의 기반이 되는 BaseOperator로부터 상속 된 공통적인 인수 (e.g. retries)와 BashOperator에서 제공하는 특정 인수 (e.g. bash_command)를 조합하여 작업을 구성합니다. BaseOperator의 인수와 그 기능에 대한 자세한 내용은 airflow.models.BaseOperator 문서를 참조하십시오.
작업에 인수가 적용되는 우선 순위는 다음과 같습니다.
- 명시적으로 전달 된 인수
- default_args dictionary를 통해 전달 된 인수
- Operator의 기본 값 (기본 값이 존재하는 경우)
이번에는 PythonOperator를 사용해서 작업을 구성해 보겠습니다. PythonOperator는 python_callable 인수에 정의 된 print_hello() 함수를 실행합니다.
def print_hello():
    return “Hello world!”

t3 = PythonOperator(
    task_id=’hello_task’,
    python_callable=print_hello,
    dag=dag
)
Templating with Jinja
Airflow는 Jinja templating의 기능을 사용하여 파이프라인 작업을 구성하기 위해 built-in parameter 및 macros를 활용 할 수 있습니다. 또한, 파이프라인 작성자가 Airflow의 Hooks 기능을 통해 자체적으로 parameter, macros 및 template를 직접 커스텀 개발하여 사용할 수도 있습니다.
이 가이드는 Airflow에서 template으로 수행 할 수 있는 작업에 대해 간략히 설명하여 이러한 기능이 존재 함을 여러분들이 인지하는 것이 목표 입니다.
templated_command = """
{% for i in range(5) %}
    echo "{{ ds }}"
    echo "{{ macros.ds_add(ds, 7)}}"
    echo "{{ params.my_param }}"
{% endfor %}
"""

t4 = BashOperator(
    task_id='templated',
    depends_on_past=False,
    bash_command=templated_command,
    params={'my_param': 'Parameter I passed in'},
    dag=dag,
)
templated_command는 코드 로직을 {% %} 블록에 포함하고, {{ds}}와 같은 파라미터를 참조하고, {{macros.ds_add(ds, 7)}}와 같은 함수를 호출하고, {{params.my_param}}와 같은 BashOperator의 정의 된 user-defined 파라미터를 참조 할 수 있습니다.
Jinja Template에 대한 자세한 내용은 Jinja Template 문서를 참고하십시오. 그리고 Jinja Template에서 참조할 수 있는 parameter 및 Macros에 대한 자세한 내용은 Macros 문서를 참고 하십시오.
Setting up Dependencies
앞서 서로 종속성이 없는 t1, t2, t3 작업을 정의하였습니다. 다음은 Airflow에서 작업 간의 종속성을 정의하는 몇 가지 방법을 알아보겠습니다.
# This means that t2 will depend on t1
# and t3 depend on t2
# and t4 depend on t2
t1.set_downstream(t2)
t2.set_downstream(t3)
t2.set_downstream(t4)

# Or you can set it in opposite way
t2.set_upstream(t1)
t3.set_upstream(t2)
t4.set_upstream(t2)

# Alternatively, you can use double bit shift operator to chain the tasks
t1 >> t2
t2 >> t3
t2 >> t4

# Or using the upstream dependency with the bit shift operator
t2 << t1
t3 << t2
t4 << t2

# A list of tasks can also be set as dependencies.
# These operations all have the same effect:
t1.set_downstream(t2)
t2.set_downstream([t3, t4])

t1 >> t2 >> [t3, t4]
[t3, t4] << t2 << t1
DAG를 실행 할 때 DAG에 루프 (loop)가 존재하거나, 작업의 종속성이 두 번 이상 참조 된 경우 Exception 에러가 발행합니다.
Final Script
지금까지 기본적인 Airflow 개념을 바탕으로 빌드 업 해온 최종 코드는 다음과 같습니다.
from datetime import timedelta

# The DAG object; we'll need this to instantiate a DAG
from airflow import DAG

# Operators; we need this to operate!
from airflow.operators.bash_operator import BashOperator
from airflow.operators.python_operator import PythonOperator
from airflow.utils.dates import days_ago

# These args will get passed on to each operator
# You can override them on a per-task basis during operator initialization
default_args = {
    'owner': 'airflow',
    'depends_on_past': False,
    'email': ['airflow@example.com'],
    'email_on_failure': False,
    'email_on_retry': False,
    'retries': 1,
    'retry_delay': timedelta(minutes=5)
}

dag = DAG(
    'Basic_DAG',
    default_args=default_args,
    description='A basic DAG',
    schedule_interval=timedelta(days=1),
    start_date=days_ago(2),
    tags=['example'],
)

# t1, t2 and t3 are examples of tasks created by instantiating operators
t1 = BashOperator(
    task_id='print_date',
    bash_command='date',
    dag=dag,
)


t2 = BashOperator(
    task_id='sleep',
    depends_on_past=False,
    bash_command='sleep 5',
    retries=3,
    dag=dag,
)

def print_hello():
    return 'Hello world!'

t3 = PythonOperator(
    task_id='hello_task',
    python_callable=print_hello,
    dag=dag
)


templated_command = """
{% for i in range(5) %}
    echo "{{ ds }}"
    echo "{{ macros.ds_add(ds, 7)}}"
    echo "{{ params.my_param }}"
{% endfor %}
"""

t4 = BashOperator(
    task_id='templated',
    depends_on_past=False,
    bash_command=templated_command,
    params={'my_param': 'Parameter I passed in'},
    dag=dag,
)

t1 >> t2 >> [t3, t4]
이제 완성 된 DAG를 실행 해 보기 위해 위 스크립트를 Cloud9 workspace로 copy/paste 하여 Python 파일 (.py)로 저장하고, Airflow S3 bucket의 dags 폴더로 업로드 하겠습니다.
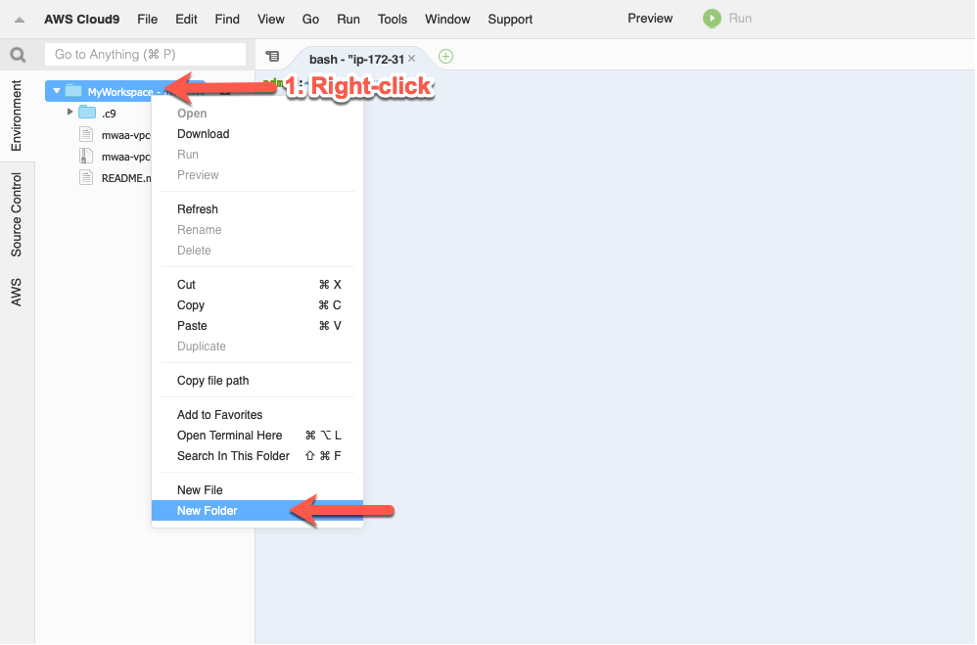
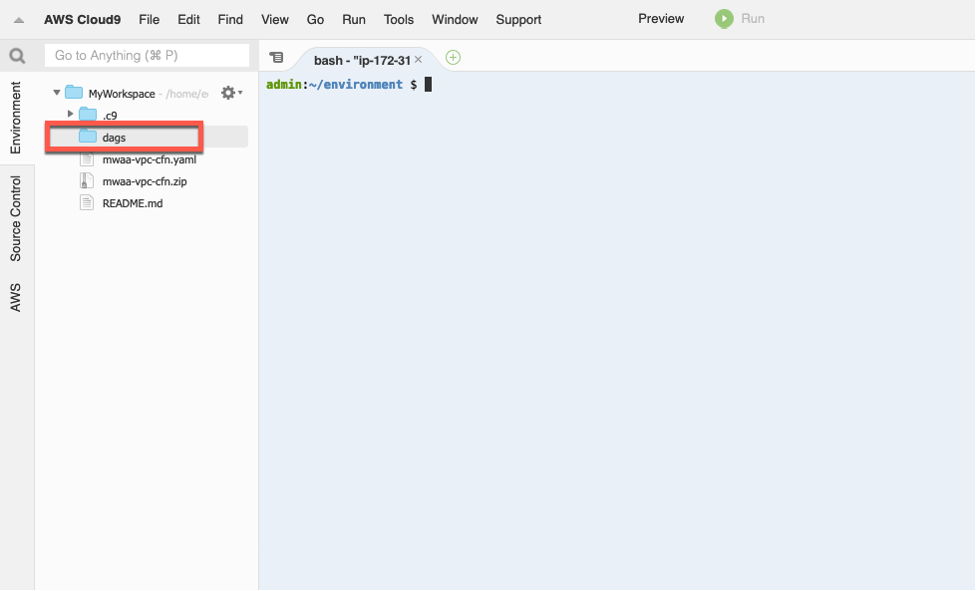
- Cloud9 workspace에서 먼저 DAG 파일을 저장 할 dags 폴더를 생성하십시오.
- Cloud9 workspace에서 New File을 추가하십시오.
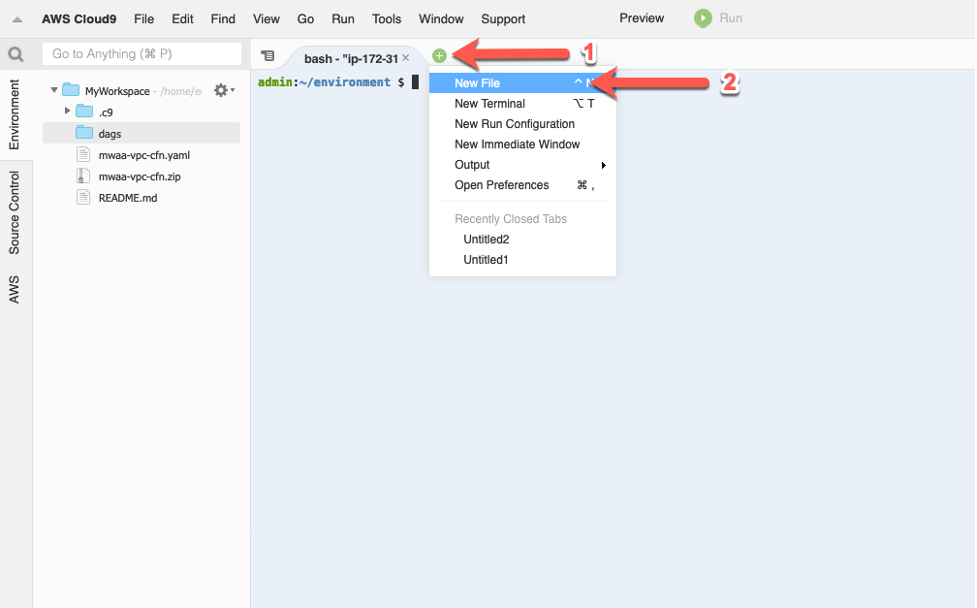
- DAG script를 copy/paste 한 다음 파일 이름을
basic_DAG.py으로 입력하고 dags 폴더에 저장하십시오.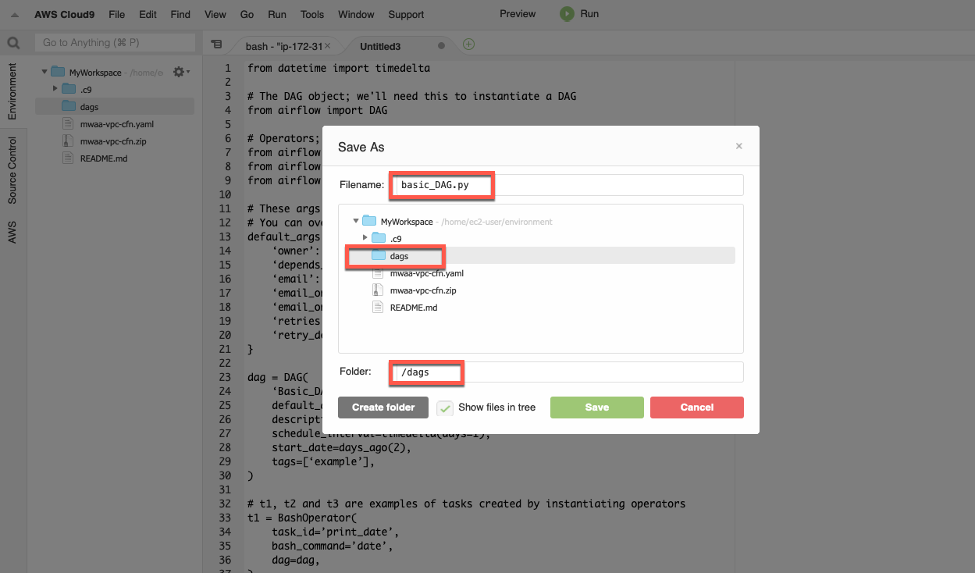
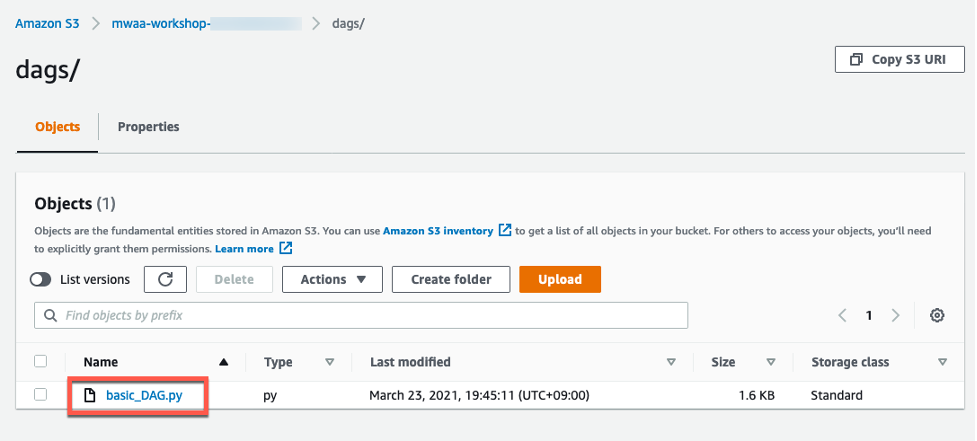
- DAG를 Airflow에서 사용하려면 DAG 파일을 Airflow S3 bucket의 dags 폴더로 업로드 해야 합니다. Cloud9의 terminal에서 다음 AWS CLI 명령어를 실행하십시오.
CLI를 실행하기 전에 <your_aws_account_id> 문구는 현재 사용하고 있는 12자리 AWS Account ID로 변경해야 합니다.
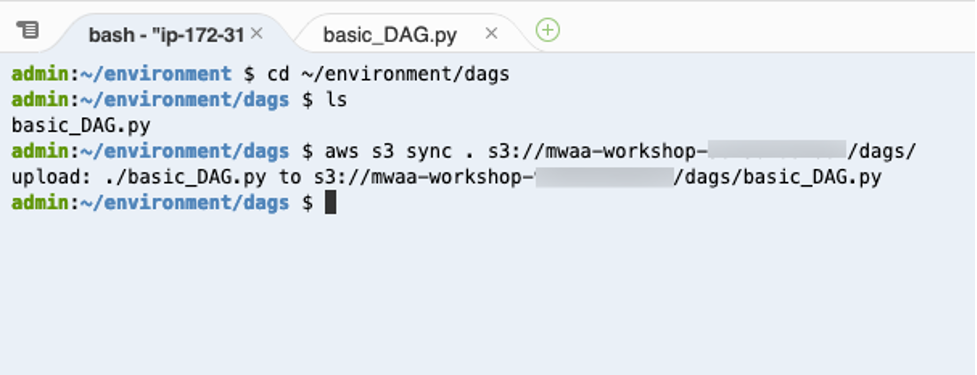
cd ~/environment/dags
ls
aws s3 sync . s3://mwaa-workshop-<your_aws_account_id>/dags/
 5. basic_DAG.py 파일이 S3 bucket에 성공적으로 업로드 되었는 지 S3 콘솔에서도 확인 하십시오.
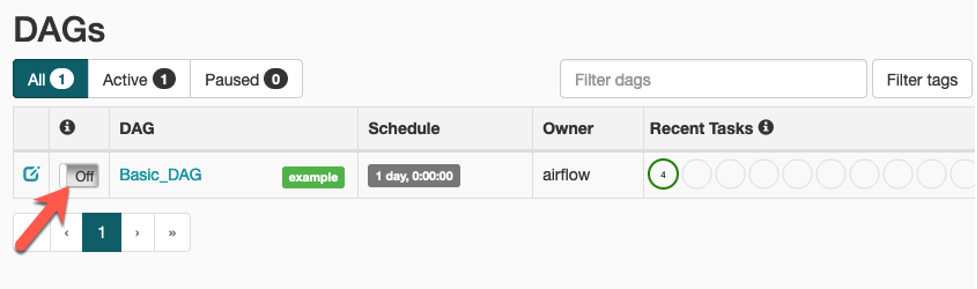
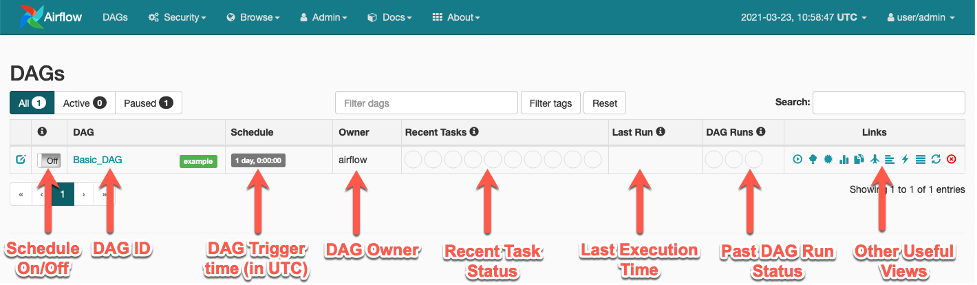
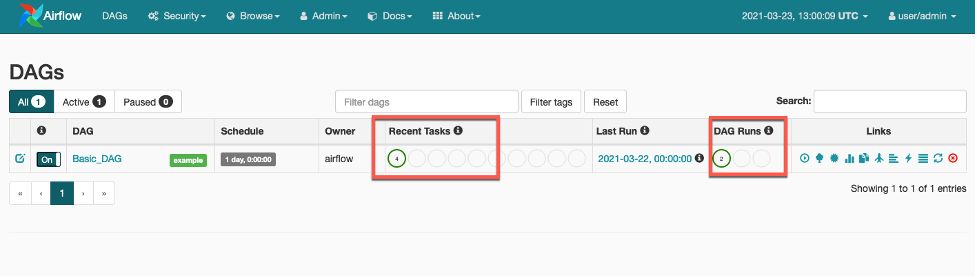
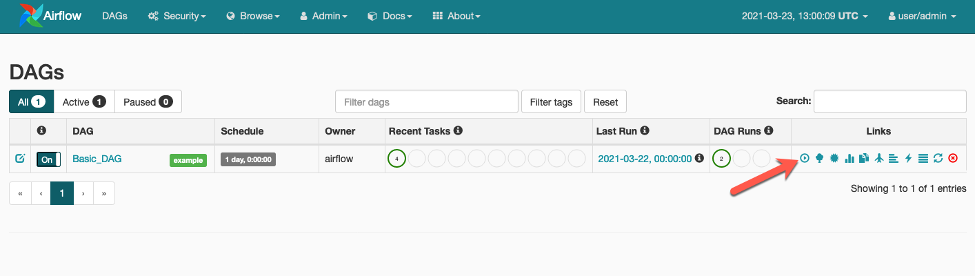
 6. Airflow UI를 액세스하면 Basic_DAG가 화면에 나타납니다. DAG는 스케줄링이 켜져 있지 않은 Off 상태이며 On 상태로 변경하면 DAG 설정 되로 UTC 시간으로 매일 12:00am에 트리거 됩니다. DAG가 실행되면 Recent Tasks 컬럼과 DAG Runs 컬럼을 통해 Task 및 DAG의 수행 상태가 표시 됩니다. Links 컬럼에는 DAG의 작업 로그 및 다양한 View를 볼 수 있는 기능이 제공됩니다.
아래 스크린샷은 Airflow v1.10.12 입니다. v2.0.2에서는 UI가 개선되어 조금 세련 된 느낌을 제공하지만 전반적으로 기능과 네비게이션 경험 크게 다르지 않습니다. 만약 메뉴/기능을 찾는 데 어려움이 있다면 강사에게 문의 해 주십시오.
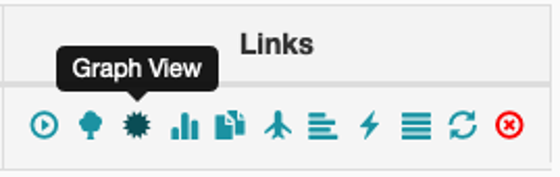
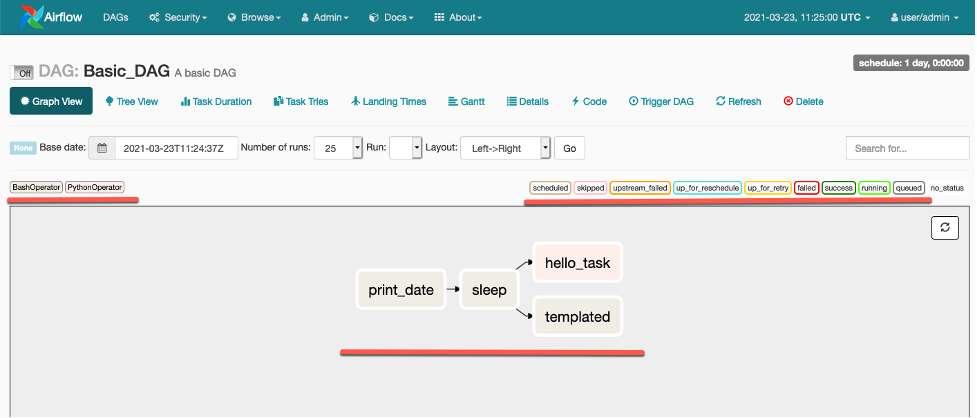
- Links 컬럼에서 Graph View를 클릭 하십시오. .
v1.10.12:
v2.0.2:

-
DAG 스크립트에서 정의 한 대로 작업의 종속성 (dependency) 및 수행 순서대로 workflow가 정렬 되어 있습니다. 그리고 왼쪽 상단과 오른쪽 상단에 밑줄로 표신 된 부분에는 각 작업이 어떤 Operator의 작업이고 어떤 상태인지 표시합니다. 즉, print_date, sleep 및 templated 작업은 BashOperator의 작업이고, hello_task는 PythonOperator의 작업 임을 나타냅니다. 현재 모든 작업은 실행 된 적이 없는 no_status 상태 입니다.
-
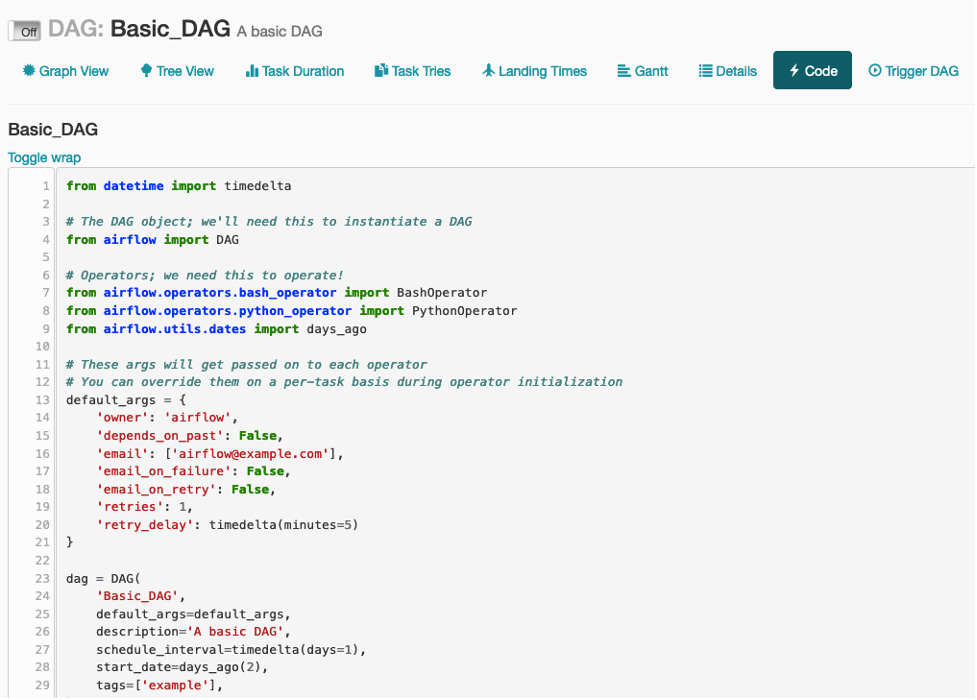
다음은 Code View를 클릭 하십시오. Code View는 Airflow에서 현재 사용 중인 DAG 스크립트를 확인 할 수 있습니다. DAG 스크립트는 Code View에서 변경 할 수 없는 read-only 입니다.

-
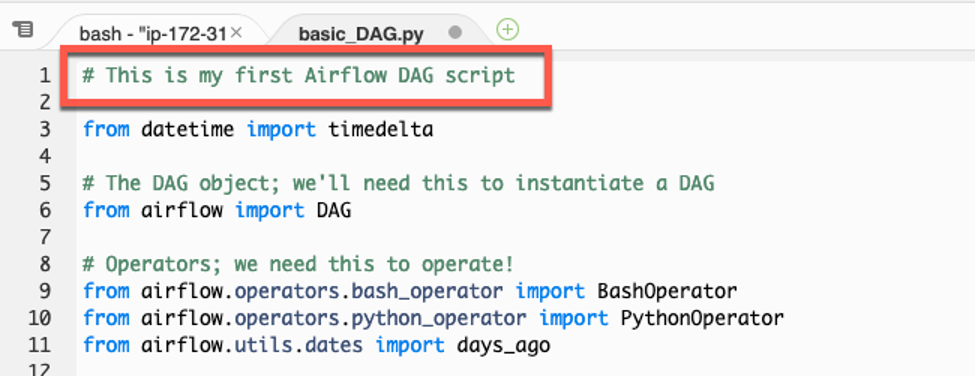
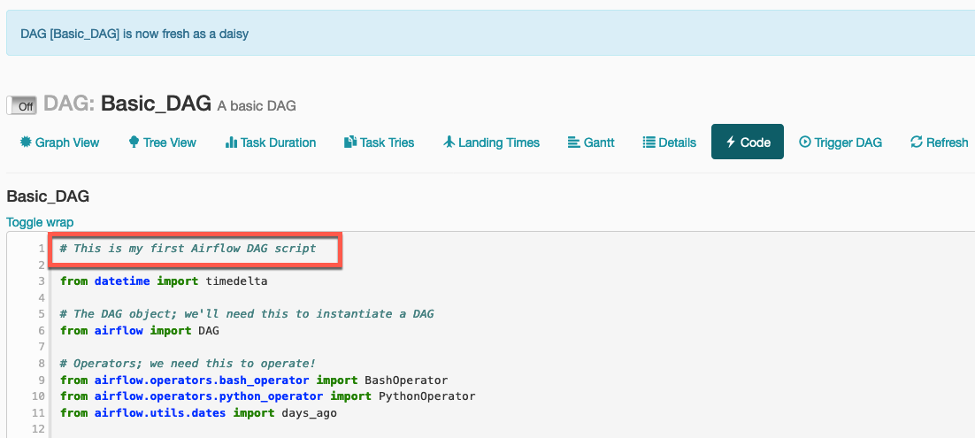
DAG 스크립트를 변경하고 Airflow에 반영해 보겠습니다. Cloud9에서 basic_DAG.py 스크립트 첫번째 줄에 주석(comment)을 추가하고 저장하십시오. 그리고 변경 된 스크립트를 Airflow S3 bucket의 dags 폴더로 다시 업로드 하십시오.
-
Airflow UI에 Code View로 돌아와서 Refresh를 클릭하십시오. 그리고 첫번째 줄에 추가 한 주석이 Code View에 반영 되었는 지 확인 하십시오.
Airflow의 DAG 동기화 주기로 인해 즉시 업데이트 되지 않을 수도 있으니 바로 반영 안될 경우 Refresh 버튼을 여러 번 시도해 보십시오.
v1.10.12:

v2.0.2:

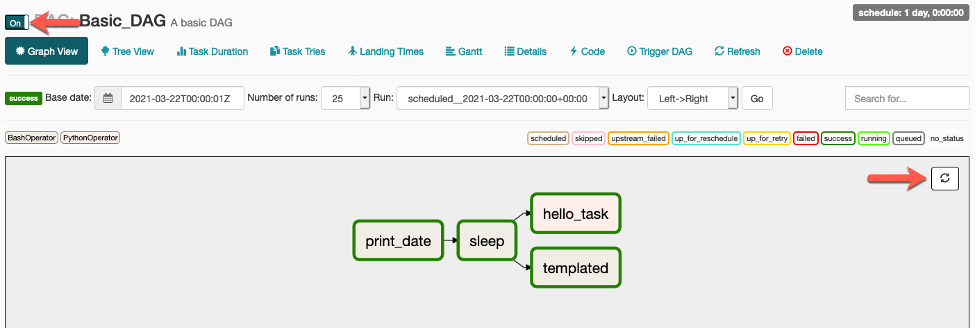
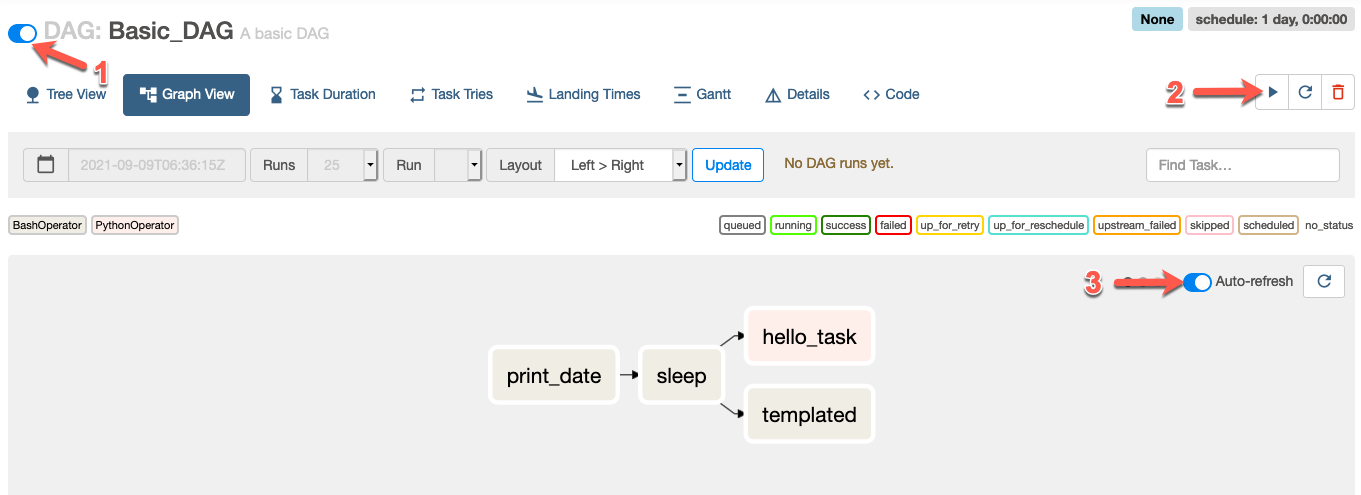
- Graph View로 가서 DAG를 실행 하겠습니다. 먼저 toggle switch 상태를 On으로 변경하십시오. 그런 다음 workflow를 트리거 하십시오. 작업의 진행 상태는 workflow 오른 쪽에 위치 한 Refresh 버튼을 클릭하여 확인 할 수 있습니다. 작업의 테두리 색깔이 초록색이면 실행 상태인 것이며 녹색이면 성공적으로 완료 된 것 입니다.
Airflow v2.0.2에는 Auto-refresh 기능이 UI에 추가되어 해당 기능을 활성화만하면 수동으로 Refresh를 클릭하지 않아도 됩니다.
v1.10.12:
v2.0.2:
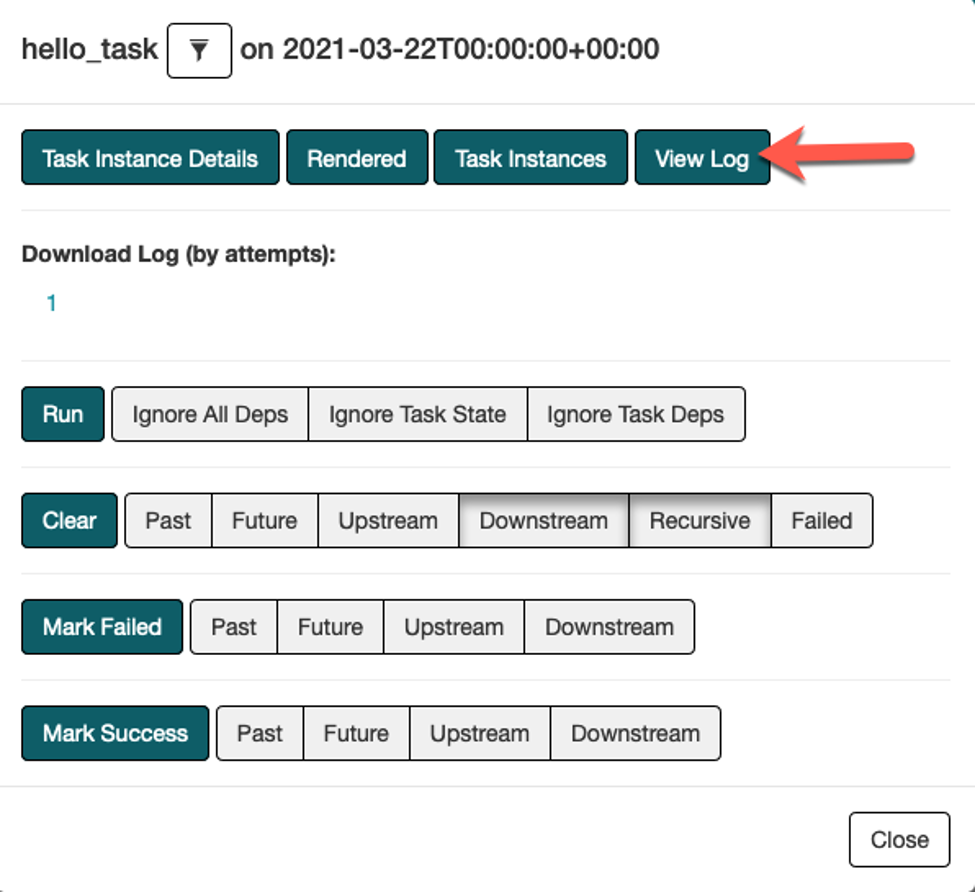
- 작업의 상태는 수동으로 변경 가능하여 해당 작업을 언제든지 재실행 할 수 있습니다. 만약 workflow의 특정 작업이 실패해서 문제를 해결한 후 재실행해야 한다면, Workflow 처음부터 시작할 필요없이 실패한 작업 시점부터 재실행 할 수 있습니다. hello_task를 클릭하여 어떤 상태로 변경 할 수 있는 지 확인해 보십시오.
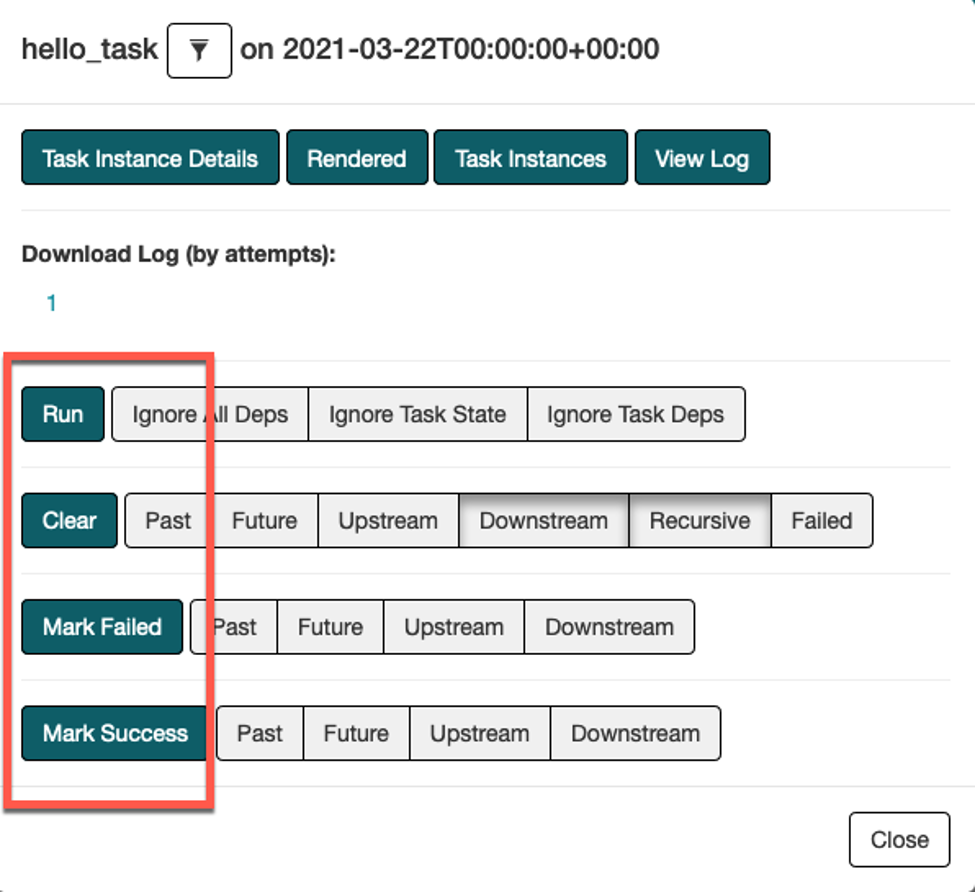
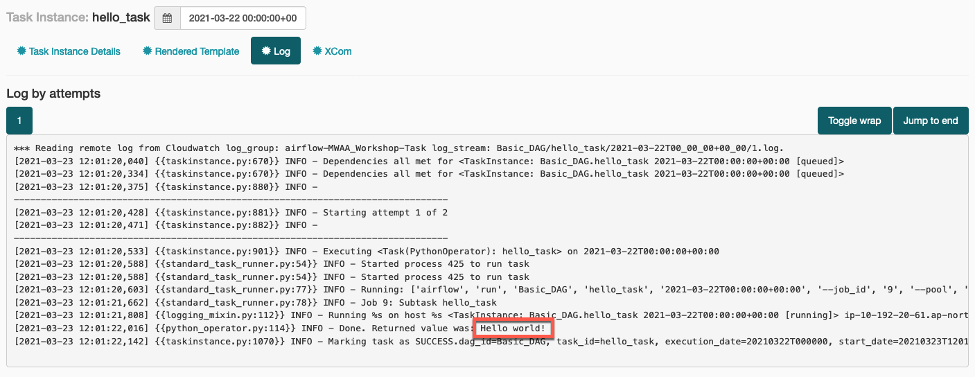
- 작업의 오류가 있어 troubleshooting 또는 debugging을 해야 할 경우 View Log를 클릭하여 로그를 볼 수 있습니다. hello_task의 로그를 살펴보면 DAG 스크립트의 Python 함수의 리턴 값을 확인 할 수 있습니다.
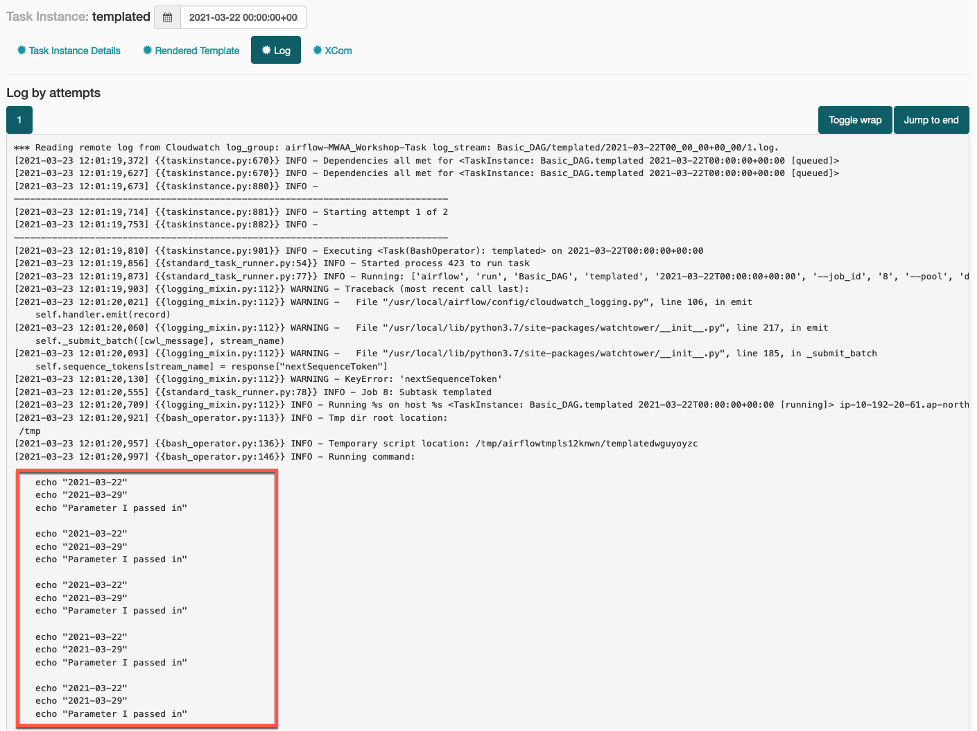
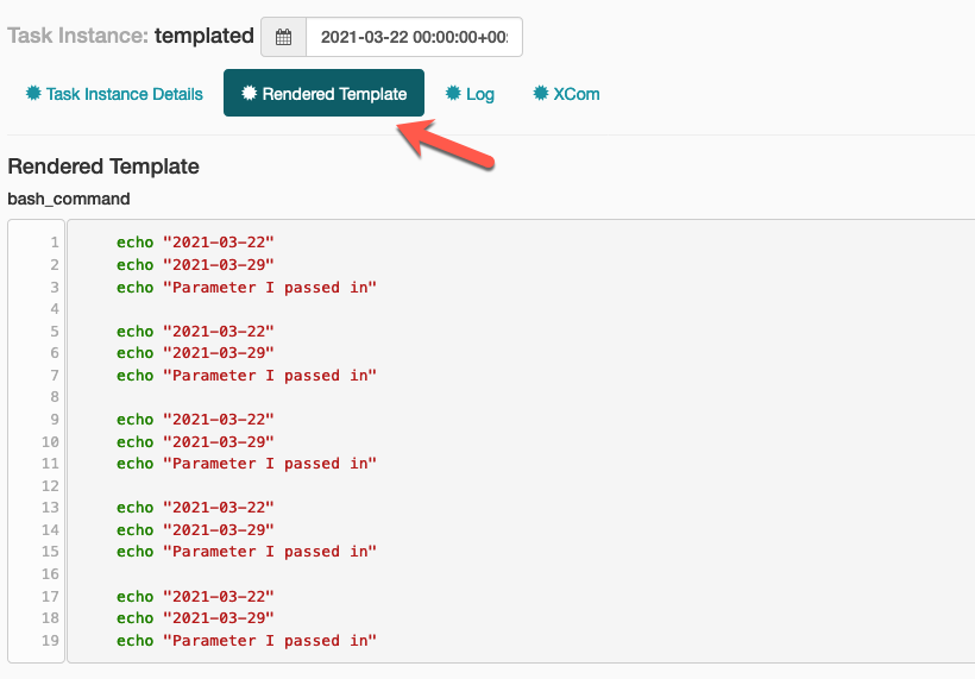
- 다음은 templated 작업의 로그를 살펴 보십시오. DAG 스크립트의 Jinja template을 통해 채워진 파라미터 값들을 로그에서 확인 할 수 있습니다. 또한 Rendered Template을 클릭하면 template에 렌더링 된 값을 보다 쉽게 확인 할 수도 있습니다.
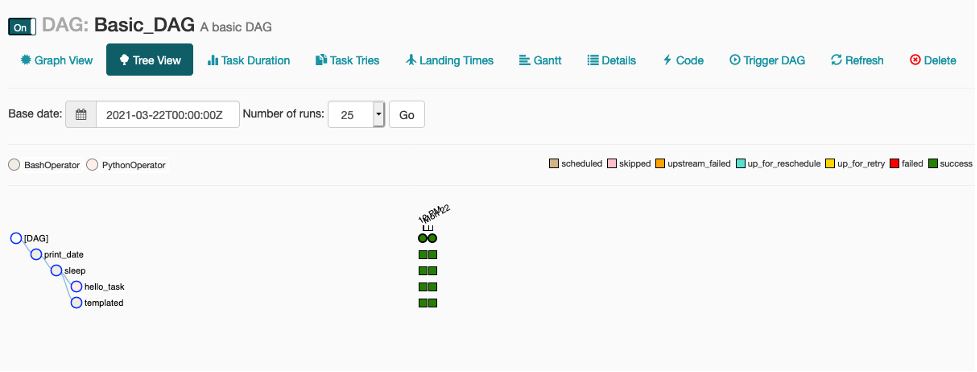
- 다음은 Tree View를 살펴보십시오. Tree View를 보면 다음 화면과 같이 각 작업의 과거 실행 이력을 볼 수 있습니다. 이 경우에는 Workflow가 두 번 실행 된 이력을 보여주는 데, 그 이유는 DAG 설정에서 start_date 인수 값을 현재 날짜에서 2틀 전으로 설정했었고, DAG가 매일 한 번씩 (12:00am UTC) 실행 되도록 schedule_interval을 설정했었기 때문입니다. 따라서 Airflow는 start_date 부터 작업을 실행하는 데 기본적으로 실행 된 이력이 없는 지나간 시간을 모두 catchup 하게 됩니다. 만약 catchup 이 필요 없을 경우 catchup=False를 DAG 오브젝트에 추가 설정하면 됩니다.
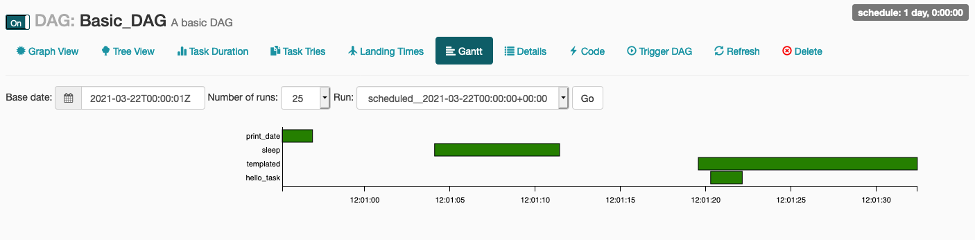
- 다음은 Gantt View를 살펴보십시오. Gantt View는 각 작업의 수행 시간을 timeline 그래프로 볼 수 있습니다. 보시면 짦은 작업과 긴 작업을 쉽게 구별 할 수 있고, templated와 hello_task 같은 경우 병렬 작업으로 수행 된 것을 쉽게 확인 할 수 있습니다.
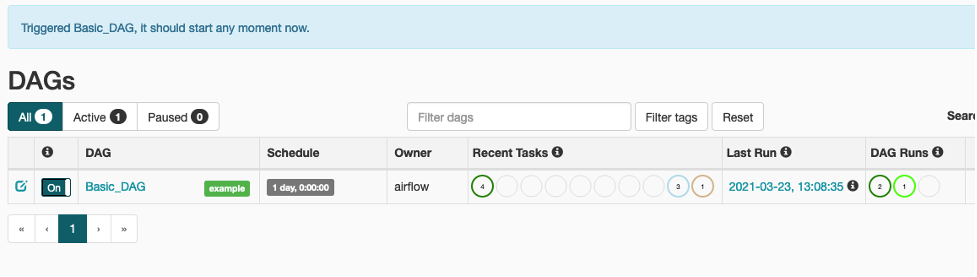
- Airflow UI 홈 화면으로 돌아가면 Recent Task 컬럼은 Workflow의 구성 된 4개의 Task가 성공적으로 완료 된 상태인 것을 표시하고 있으며, DAG Runs 컬럼은 2번의 DAG 실행이 성공 한 상태인 것을 표시하고 있습니다.
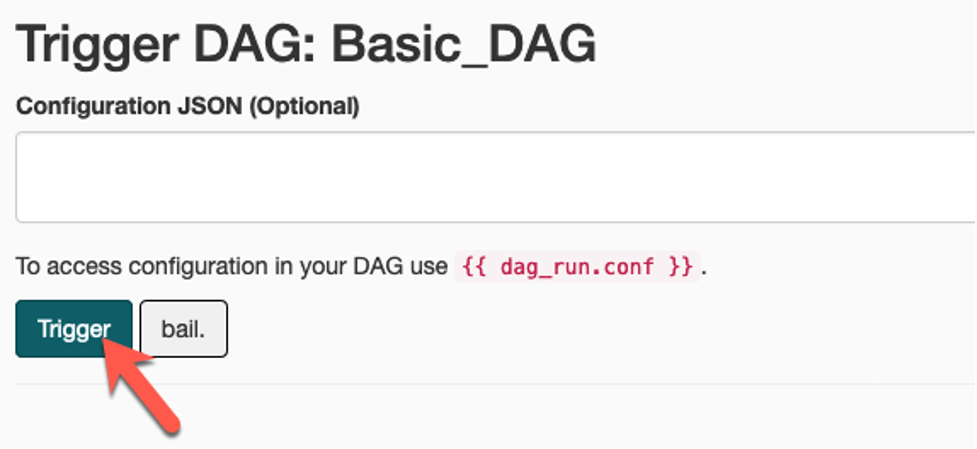
- 일반적으로 DAG는 스케줄링하여 트리거 하지만 다음 스케줄링 시간까지 기다릴 필요 없이 수동으로 트리거 할 수도 있습니다. 트리거 버튼을 클릭하여 Workflow를 시작 하십시오.
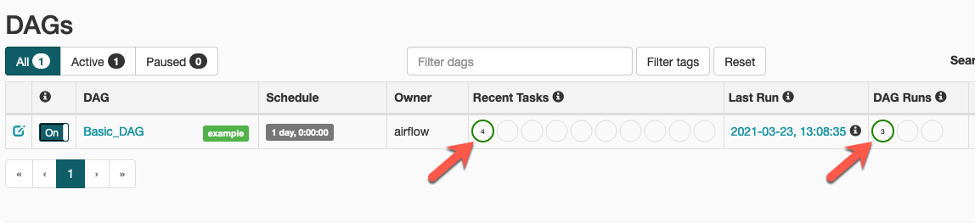
- 다음 화면과 같이 DAG Runs의 count가 3으로 증가 했고 가장 최근 수행 된 DAG는 4개의 작업을 성공적으로 완료 했습니다.
- DAG가 더이상 수행 할 필요가 없기 때문에 toggle switch 상태를 Off로 변경 하십시오.